Sunday, 12 April 2015

The return of Union


Some of you may know that when I started this blog almost a year ago, amongst my first posts were the first minis and games that I ever played in 6mm. Since the playtesting on Starstrike began, I have wanted to bring something of my initial 6mil forces into it.

But since they were all element-based and I might still use them as such for Company commander or another ruleset, I needed to start from scratch. Luckily I had more than half of my original purchase of infantry untouched.

So the GEU, or Union return to my gaming table, and their great adversary, the Warg Industries will as well, as soon as I paint up more of them!

The full platoon of infantry, with two sections of power armor. All the vehicles were single-based affairs, so I'll be using the original ones.

 Quick close-up of one of the PA sections..

..And of the regulars.

I'm happy to report that the Sci-fi side of things are getting some more space as of late, even if my Fantasy project is still being prioritized.
 As soon as Sci-fi popped back on the to-do list for real, I of course had a couple of ideas for some settings/games/rules that would be (in my mind) really cool. It seems I'm not happy if I don't try to do too much at once..

That's all for today's small update, but I just finished up another 30 or so models the other night, so I have some treats coming up, Sci-fi and Fantasy both!

Til next time!

Friday, 10 April 2015

More playtesting

The last couple of weeks there has been a lot of testing going on, and not all of it Starstrike.

In the ever-elusive quest to have some rules that feels just right for my micro-scale fantasy skirmishes, I have run a few more playtests, revising my original idea and polishing the revisions some more..

Here are a few shots in some sort of order:


The Dark Elf raiding party closes on the Ashen wastelanders. 

A Chaos demon summoned from another plane quickly engages the elves. 

2 elves jump a warrior, flanking him and putting him in quite a spot. But have they seen the danger that lurks to their left?

Facing down both warlord and slave-warriors prooves too much, the demon vanishes in a puff of smoke and fire, but not before wounding his adversaries.

A brave warrior charges the Sorcerer, but his magical might is just too great. With a flick of the sorcerers wrist, his palefire consumes the elven slave-warrior. 

A tough spot for a lone warrior, assaulted by both warlord and sorceress! 

Most of the men of the ashen wastes have fallen, but the sorcerer hold out with inhuman tenacity.

His gifts are more powerfull than most this day, and both sorceress and warlord fall to his fell magic.


A second encounter, at a sulphur pit, deep in the desert. 

A warrior from each side is quickly dispatched,as crossbow bolts fly across the desert floor.
It doesn't take long for the bolts of magic energy to start flying as well.. 

And soon both magicans fall, the sorceress of the dark elves to a bolt of chaos energy, and the offending sorcerer to a crossbow bolt.

The Demon once more is the target of most of the elves attention. He puts up a good fight, but is eventually brought low yet again.

 Having conquered their main threats, the warlord take his time cleaning up the rest of his enemies..

The latest playtest we ran was slightly different, just 3 heroes on one side, facing off against a group of goblins:

A wizard, a Cleric and a Barbarian was trekking through the desert, when suddenly..
No less than 7 goblin warriors along with a shaman, led by a Boss and his champion, appear opposite the heroes. 


This first game showed that some of the values assigned the goblins were a bit off the mark, so we modified and tried again.


The second game went much more like we had hoped, the heroes managed to beat the Goblins, but it was a close call!
 The action was interesting enough that I only took the 3 usable pics during the 2nd game. At the end, no hero had fallen, but the barbarian, target of most attacks had only a pair of hits left.

The cleric was really the star of the hero party, he didn't do much in the ways of Goblin-slaying, but if he hadn't healed both the barbarian and the wizard at opportune times, none of them would be here anymore!


That's all for today, but rest assured there will be more in the future. I'm currently working on random tables for dungeon crawling, to handle dungeon, monster and treasure generation.
 I also have an old(relatively speaking) sci-fi faction that's making a return in my skirmish games, and some more fantasy terrain that I just finished.

Til next time!

Friday, 3 April 2015

3rd game of Starstrike

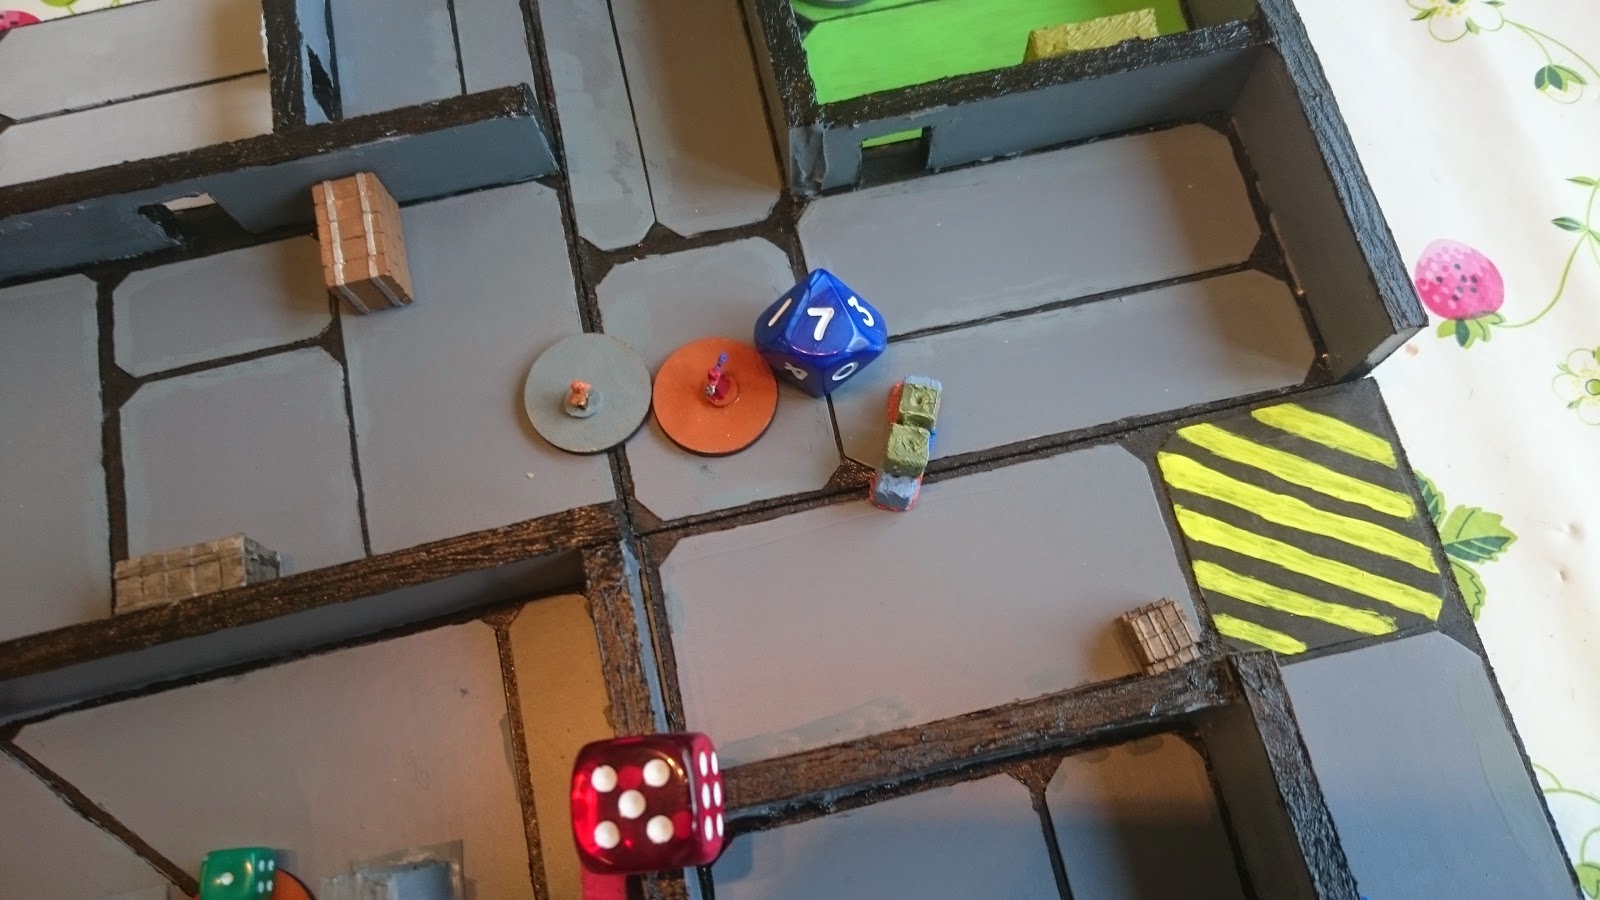
During this playtest game of Starstrike I finally got to use the gaming tiles I recently finished, along with some rules for Psionics.

For this game I switched out most of the models used in previous games, and went for 2 entirely different forces:

Cultists:


Cultist brothers 5 models
Sp    5
Su    4
Tr     4
Mo  7
Di    4
Ld   1
1 shotgun, 3 assault rifles and 1 SAW


Cultist Touched 5 models
Sp    5
Su    5
Tr     5
Mo  7
Di    4
Ld   2
5 pistols, 4 armed with mutated limbs (count as knife) and one with a claw mutation (power gauntlet)


Maidens 3 models
Sp    5
Su    5
Tr     4
Mo  7
Di    4
Ld   1
Brawler and sprint skill on all 3, all of them carried only a chainsword


The psion & her bodyguard

Kelly (Psion)
Sp    5
Su    4
Tr     4
Mo  8
Di    4
Psi   5
Carries a pistol


Doc
Sp    5
Su    5
Tr     6
Mo  6
Di    5
Ld   2
Doc is a hero and carries a shotgun


Doc's dogs 4 models
Sp    5
Su    5
Tr     5
Mo  6
Di    5
Lead by Doc, carries 1 pistol, 2 assault rifles and 1 sniper rifle


Adventurers  4 models
Sp    5
Su    5
Tr     5
Mo  6
Di    5
Ld   1
2 assault rifles, 1 smg, 1 shotgun
 

Kelly, a recently discovered Psion, needed to get the hell out of Dodge. Some crazy cultists were after her, for purposes unknown but probably bad. She had hired a local man called Doc and his men, along with a rag-tag band of adventurers to help her escape her hideout, a small spaceport.

The Cultists had gotten wind of her location, and they flooded in to the building. Now they just had to shoot their way through..

 The spaceport at the beginning of the game.
Kelly need to reach the car in the lower right corner.

Both sides starts to shuffle through the corridors, vary of any enemies that might appear.

Not given to caution, the cultists make for the sector that Kelly was last reported seen in.


Suddenly some of the adventurers break into the open space, guns trained on the maidens.
One maiden goes heads down, but otherwise they are unscathed by the incoming fire.

 Kelly and Doc tries to take the long way around, going for the corridor running along the right side of the building, while their comrades hold the cultists at bay. It doesn't take long for the maidens to reach their prey however, and the revving of chainblades can be heard, along with screams as to men fall.


Spurred to greater feats of marksmanship than ususal, the surviving adventurers pin down the maidens, even if they at first fail to wound them.
 It doesn't take long before a bullet finds it's mark however, felling the first of the cults numbers.  


Poking his head out was a bad idea it turns out, as Doc gets shot in the face for his troubles.
 The cultist made a  1 in a 100 shot, hitting and dispatching the hero on the first try. Ouch..

Doc's dogs take their first stress marker, having just lost their leader doesn't help morale.
The cult is closing in on all fronts, making this a desperate situation for our poor psion.

Luckily, they are bad shots, and no more fall prey to them, at least for now.
Start of turn 4
 
 A bold move by the dogs is rewarded with death, as a cultist slashes his throat.


Shots are flying left and right, and both cultists and more adventurers, along with one more dog goes down.

Kelly uses her powers for for the first time, trying to boost her deadlyness in meleé, but she fails to control her power.

She charges anyway, and with a swift kick it's all over. the cultist lies dead at her feet.  

The battle rages on, with both sides at an inpasse.

Lives are traded, as lucky shots makes it through, but for the most part only heads down are inflicted.
 By the 7th turn only a few of Kelly's bodyguard remain, fighting desperately for their lives in the cargo bay.
 Kelly herself sneaks arond the right flank, hoping to make her escape thanks to her guards sacrifice. But there is a cult member moving for her at that moment..


Another cultist fall to the struggling remnant, even as their charge moves closer and closer to danger..


Kelly is surprised when the cultist rounds the corner, but not unprepared. Grabbing hold of her power, and focusing it into a point, she uses it as a blade to Close with and cleave her foe in two. This time her powers do not fail her..   


Just as the cultist fall, so does her last protector.
But they have bought her enough time, she is free, for another day at least.. 
 
 
Kelly is victorious, she manages to escape, if at a heavy cost.

It was a totally unexpected outcome, the cultists took out all but one enemy. Ultimately a fun game with many twists and a good cinematic feel.

Spaceport tiles

Ever since I saw the tiles made by Spacejacker link and then the 6mm one by Stroezie link, I have wanted one of my own. Late last year I started making one, but it took till last week before I actually finished the first 9 tiles.


The naked tiles.  

My initial set up for the 3rd game of Starstrike.
 
These pieces are so versatile, and when I had finished playing a game on them I realized I want to make even more tiles, to be able to switch things around some more, and try and reach a full 2"x2" in size, since they at this moment only occupy 36x36 cm..
 
Next up is my AAR from the game played on these tiles, check back in a bit!

Wednesday, 1 April 2015

2nd game of Starstrike

After getting into the swing of things with my first game, I gladly prepped the table this weekend to try out some of the new terrain, and switched out one of the factions.

I wanted to try out an more assymetric scenario, with a few elites against a larger group of rebels.

The forces this time around was:

Rebels:

Rebel leader 1 model
Sp  5
Su  6
Tr   5
Mo 5
Di  5
Ld 1
Armed with Assault rifle


Rebel squad 1 4 models
Sp  5
Su  3
Tr   4
Mo 7
Di  4
4 assault rifles


Rebel squad 2 4 models
Sp  5
Su  3
Tr   4
Mo 7
Di  4
Ld1
4 assault rifles


Mercenaries 5 models
Sp  5
Su  5
Tr   6
Mo 7
Di  6
Ld 1
5 heavy rifles and grenades


And facing them was:

Bloodmist Power-Armor squad 6 models
Sp  4
Su  8
Tr   6
Mo 8
Di  7
3 carbines
1 Squad automatic
1 Beam Cannon
All were equipped with Power gauntlets.


The PA squad was tasked with disruption, hired to kill at least 2 of the 4 rebel leaders, while the rebels needed to hold out for 4 turns. A secondary objective for the rebels was to kill at least 3 of the attacking PA.

The battlefield. A small village where the rebels holed up, planning their next strike in their revolt.

The Bloodmist quickly siezed the initiative, moving up into good cover. Both rebels and their mercs rushed for cover, hoping to get into an advantageous position. Bullets were soon flying and the machinegun of a PA specialist reaped bloody harvest, taking out a merc and their leader!

Pulling of a lucky shot, one of the rebels managed not only to hit the PA leader, but rolled a natural 10 for damage, knocking out the enemy!

Moving up yet again, the left-most rebels draw a bead on one of the bloodmist as he's crossing open ground, and they open fire. The hail of automatic fire forces the trooper to go heads down, but his armor protects him from any further harm.

The following round, the pinned trooper gets himself into cover and returns fire. The unlucky rebel doesn't have the advantage of heavy powered armour, and goes down.

On the right flank the Bloodmist troopers manage to take out one more merc as they reposition themselves.

 The single most bloody event of the game takes place here, when the second Bloodmist specialist fires his beam cannon, hitting and killing 3 of the four rebels, including their leader!

At this point they had taken out the minimum 2 leaders, but with time to spare, they aimed for all of them, this would later prove a mistake. 

 A couple of shots are traded, a few heads down are inflicted, but no further casualties on either side.

Start of the third turn, the Bloodmist aim to assault the leader of the right flank. Quickly the plan is halted in it's tracks however, as the trooper charging across open ground is pinned down yet again.

On the left flank the mercs manage to knock out the PA specialist with the machinegun, while only being pinned by the return fire from his comrade.

Under heavy fire, the one trooper pushes on, determined to get the leader on the right flank. But he is again stopped short by reaction fire. 

With most of the remaining rebels firing on him, the trooper takes 5 heads down counters, buffeted this way and that by incoming fire, before the attrition gets him and a bullet finds it's way through his armor.

With both sides having fullfilled an objective, I called this game a draw. The kill count was 7 to 3 in the Bloodmists favour. If they had only fallen back after completing the mission rather than going for extra credit, it would have been a solid win.

The purpose of this game was to strech the limits and see if a single elite squad with good armour and weapons could hold their own against a larger force. and with mission completed and a better than 2:1 kill ratio, I'd say it worked out fine.

As for the future, I have 2 fantasy playtests that will be shared soon, with a 3rd game of Starstrike and Fantasy planned, hopefully this week!

Til next time!