Since I often play solo games I decided that I needed some randomization on hits, since choosing for both sides ends up being a bit weird. A 12 is still a crit an can be placed as usual by the attacker, for but every normal hit I rolled a d12. On a roll of 1-5 the damage is applied to movement, on a 6-10 to firepower and on 11 or 12 the armour/agility is hit.
This way it makes the hits a bit more interesting and the entire game ended up feeling a bit more cinematic, as the various hits tells a story (to my crazed mind at least)!
Enough rambling, you are here for a battle, and a battle you shall receive:
Intel from the captured NTC units after their failed breakthrough revealed various pieces of intel, including the location of a NTC laboratory. Eager to repeat their recent success, a strike team is assembled..
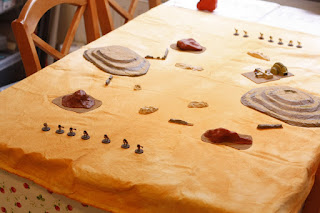
The NTC defenders. Obviously a important research facility has some protection, but oddly no infantry..
The SADU strike team.
The SADU Turtles split left and right, trying to draw some of the defenders away from their target.
Rolling up on the opposite slope, a Warrior mech fires his bazooka, damaging the Turtles weapon systems.
With most of the NTC mechs busy taking up defensive positions and firing on the attackers, one Turtle speeds in close and opens up on the generator powering the laboratory complex.
The micro-rockets blows chucks of ferrocrete out of the installation!
The start of the 2nd turn. The Strike team are moving in, they really need to run the gauntlet to their target, but they have managed some damage already!
Speeding ever closer, the SADU mech keeps firing into the generator, blowing off more pieces of shielding.
He leaves his back open to attack though, as the NTC CHQ opens up with his autocannon, compromising the fire control systems of the enemy mech.
Before the first attack stops, another of the strike team's mechs fire on the generator too, further damaging it.
The counter-attack takes only moments to materialize, as both bazooka shots and autocannon shells starts hailing.
The Turtles are hit hard, armor fragments and melts, causing a chain of malfunctions in locomotion and weapon systems.
Even as his comrades takes a pounding, another member of the strike team race in and fire on the generator. The shielding around the core finally fails, and the incandecent fury of the escaping miniature sun blinds all close to it.
In an attempt to keep the remaining parts of the strike team away from the lab. As he comes over the rise, the Warrior comes under fire from a pair of Turtles.
Sparks shoot out of his damaged leg actuators and the broken armour of his mechs chest.
One of the SADU mechs takes a hit to the legs.
The lab takes more damage as rockets ignites fires around the complex.
Up on the rise, the lone Warrior is taken out of action as one of the mechs of the strike team hits the mechs head.
Realizing that the last members of the strike team must be stopped, the NTC CHQ charges the closest SADU mech. His shoulder-charge crumples the enemy armour and smashes the head of the mech. Oily smoke rises from the crippled form.
Start of the 3rd turn. The lab is heavily damaged, if the NTC can't stop the remaining operational mechs, they might lose the whole compound!
All hell breaks loose as the remaining mechs open up on each other.
Strike after strike hits the sagging complex, damaging it further.
All of the defenders efforts focused on picking apart the agressors.
Mech after mech falls to the onslaught of their attacks as bullets saw through limbs and rockets blows them open.
In a desperate last ditch attempts, the least damaged of the strike team's mechs races forward. The micro-rockets screams toward the critically damaged structure. As they strike the bearing wall, the straining superstructure finally collapses!
As the rockets leave the barrel, a hail of shells shreds the SADU mech, knocking it out of action.
Crippled and barely standing, the SADU mechs have no recourse but to surrender to the mostly undamaged defenders of the NTC.
While the NTC had damaged and captured 3 mechs and destroyed 4 of them, they had lost the lab and it's generator.
The Imperials have won the day by completing their objective, but they were captured by the enemy!
The second try went much better than the first, making the mechs P2 and upping the armor to 2 really made a difference, as did rolling for damage. I think I'll keep all my smaller mechs at P2 as the new standard, with P3 reserved for elite and heavy units. This will allow for P3 red-shoulder style customs and such while P1 could be used for power-armour in the style of the clan elementals if need be!
All in all a success, this will be the way my VOTOMS-like games are played from now on :)
I have another Starport Scum game to share with you in the near future, and hopefully some more bits and bobs as they arrive.
Til next time!


Great read Alexander! Looks like it was a fun game
ReplyDeleteCheers, glad you enjoyed it!
DeleteSmashing looking game Alexander, another interesting report, cheers :-)
ReplyDeleteThanks Yoshimi, I aim to please ;)
Delete